

Mail
Manager Tutorial

The Mail Manager option provides several ways of managing the mail accounts you set up on your account. Additionally, if Mailing Lists have been set up for your account, you can manage them using this tool.
Contents:
Creating New Mailboxes
How to Create a New Mailbox
Editing E-mail Accounts
How to Edit an Existing E-mail Account
How to Change the Password of an E-mail Account
How to Delete an E-mail Account
Sending and Receiving Mail
How to Configure the Eudora Mail Program
How to Configure the Outlook Express Program
How to Configure Netscape Communicator/Navigator
How to Configure Claris Emailer
Mailboxes for individuals or groups can be set up using the Mail Manager option. The number of mailboxes allowable on your account depends on the package your purchased.
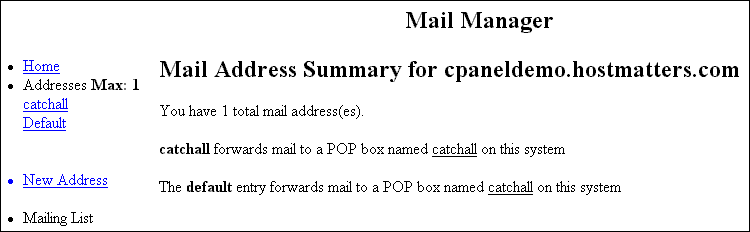
From your Control Panel, select the Mail Manager icon.
The Mail Manager displays.
Select the New Address link by single-clicking on it. The New Mailbox page displays
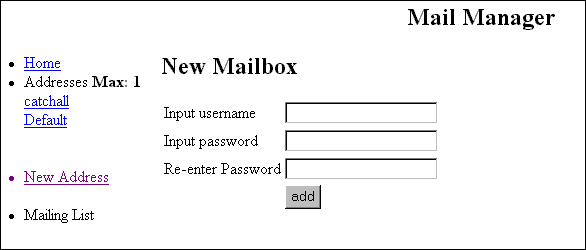
Enter the user name in the Input Username field. Enter the password in both the Input Password and Re-enter Password fields. Make sure that you type the password exactly the same way in both fields.
When completed, select the add button. A message displays indicating that the user was added successfully.
At
this point, the new user mail account can be edited, or you can return
back to the Mail Manager home. To return to the Mail Manager home,
select the Home link. If you would like to return to the main
Control Panel page, select the Control Panel link located in the upper
right corner of the top frame. If you would like to edit the newly
created account, click the link of the user name whose account you
would like to edit and continue with the next procedure.
Back to the top
E-mail accounts can be set up to forward to other mail accounts or to have automatic responses generated when mail is received by the original account. Additionally, Mail Manager allows you to delete e-mail accounts as well as change passwords for e-mail accounts.
Note: The Mail Manager Change Password tool is different from the Change Password Option that is available from the Control Panel. This Mail Manager tool affects only the password for the e-mail addresses specified. The Control Panel Option affects the password for your account.
How To Edit an Existing E-mail Account:
From the Mail Manager, select the desired e-mail account listed under the heading Addresses on the left-hand side of the screen.
The Mailbox Options page displays for the specified e-mail account.

The Change Password and Delete options are described in detail in the procedures that follow. Other options on this page deal with forwarding e-mail that is received by this account to other accounts.
These options are explained here:
-
Forwarding the e-mail sent to the original address to the same address on the specified server. This is for normal mail processing and is the default setting.
-
Forwarding the e-mail sent to this address to another address on the same, specified server. If you select this option, you must also select the address (es) from the list of possible e-mail accounts on the server to which you would like to have the e-mail forwarded.
-
Forwarding the e-mail sent to this address to another address on a different server. If you select this option, you must manually type the e-mail address to which you are having mail forwarded in the text entry box provided. This would be used if you had an existing account with another service to which you would like your mail forwarded.
After selecting the appropriate mail forwarding option, you may also manually type text in the auto-response text entry box. If you choose this, be sure to select the Autoresponse for mail to option. Any text you type in the space provided will automatically be sent to anyone who sends e-mail to the address you are currently editing.
After all edits are completed, click on the Save button to apply the changes to the account. The message "Done" appears on your screen.
To return to the Mail Manager home, select the Home link. If you would
like to return to the main Control Panel page, select the Control
Panel link located in the upper right corner of the top frame.
Back to the top
How To Change the Password of an E-mail Account:
From the Mail Manager, select the desired e-mail account listed under the heading Addresses on the left-hand side of the screen. The Mailbox Options page displays for the specified e-mail account.
Select the Change Password for e-mail account link.
The Change Password page displays.
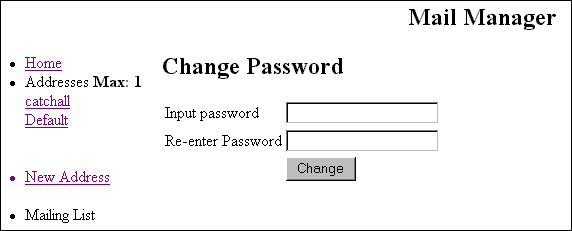
Type the new password in the Input Password and Re-enter Password fields. Be sure to type the password exactly the same way in both fields.
Select the Change button. A message displays indicating the password has been changed.
To return to the Mail Manager home, select the Home link. If you would like to return to the main Control Panel page, select the Control Panel link located in the upper right corner of the top frame.
How To Delete an E-mail Account:
From the Mail Manager, select the desired e-mail account listed under the heading Addresses on the left-hand side of the screen. The Mailbox Options page displays for the specified e-mail account.
Select the Delete e-mail account link. A confirm deletion message displays.
If you are sure you would like to delete the e-mail account, select the Delete button. A message displays indicating the e-mail account has been deleted.
To
return to the Mail Manager home, select the Home link.
If you would like to return to the main Control Panel page, select
the Control Panel link located in the upper right corner of
the top frame.
Back to the top
Sending and receiving mail is not executed in the Control Panel. The mail tools and utilities available in the Control Panel are merely ways of setting up mail accounts and lists on the server on which your account resides. To send or receive mail, use your normal mail client configured to retrieve mail from, and send mail through, your domain mail account. Two popular e-mail programs are Eudora and MS Outlook Express. The two procedures that follow briefly describe how to configure these programs to work with your e-mail account. Once configured, you will be able to use these programs to send and receive mail.
Warning: · Before beginning any of the procedures below, you should know the following information. If you do not know it you can contact support.· Your e-mail address with the company.· Your Domain Name.· Additionally, you should have the following information from your Internet Service Provider (ISP).· The ISP's SMTP (Simple Mail Transfer Protocol) mail server name.
Note:
In both of the mail programs being discussed, there are many different
configuration options and settings you can change in order to customize
the mail client for personal use. These additional features are not
covered in the procedures below. For more information on these features,
consult your mail program's documentation or help menus.
Back to the top
How To Configure the Eudora Mail Program:
In Eudora, select Tools from the main menu, and then select Options. The Options dialog box opens.
Select the Checking Mail icon located in the Category list.
On the right side of the dialog box, enter your domain name (e.g., mycompany.com) in the Mail Server field. Enter your user name for that account in the Login Name field. Fill in any additional options you would like on this screen.
Select the Incoming Mail icon located in the Category list.
On the right side of the dialog box, select the Server Configuration type of POP. Fill in any additional options you would like on this screen.
Select the Sending Mail icon located in the Category list.
On the right side of the dialog box, enter your e-mail address for the account in Return Address field. Enter the name of your Internet Service Provider's (ISP) outgoing mail server in the SMTP Server field.Fill in any additional options you would like on this screen.
Select OK to apply the changes and exit the dialog box.
Back to the top
How To Configure the Outlook Express Mail Program:
Start Outlook or Outlook Express.
Click Tools and choose Accounts.
In the "Internet Accounts Windows" click Add and choose Mail.
Fill in your name and click Next.
Click "I already have an e-mail address that I'd like to use" and fill in your email address. Click Next.
On the "Email Servers Name" page, fill in the server information. "My incoming mail server is a POP3 server." The incoming mail server should be mail.yourdomain.com. The Outgoing Mail (SMTP) should be your ISP's outgoing mail server. Click Next.
Enter
your mailbox username in the account name field, and the password
below. Click Next and then Finish.
Back to the top
How to Configure Netscape Communicator/Navigator
After loading Netscape Composer, choose Edit and then Preferences.
Click on Identity and add your personal information. Click on Mail Server. The SMTP (outgoing mail) server should be the outgoing server of your internet service provider.
Your incoming mail server is mail.yourdomain.com.
Put your mailbox username in the mail server user name box.
How to Configure Claris Emailer
Start Claris. Choose Setup and then Internet Setup.
The SMTP (outgoing mail) server should be the server of your internet service provider.
In the Account Name field, enter your domain name.
Put your mailbox username and domain name in the Email Account box.