File
Manager Tutorial

File Manager Overview
Similar to Microsoft Windows Explorer in function, the File Manager Option in the Control Panel allows you to perform file management tasks such as creating files and directories, setting the read, write or execute permissions on the files and directories in your site, renaming or deleting files or directories, and changing the password for directories that are password-protected.
Contents
Navigating in File Manager
How to Navigate the File Manager
How to Use the Listing Sort Tool
Changing File and Directory Permissions
How to Change Permission Settings on Files and Directories
Deleting Files and Directories
How to Delete Files and Directories
Renaming Files and Directories
How to Rename Files and Directories
The Directory Proctection Manager
How to Apply Password Protection to a Directory
Creating Files and Directories
How to Create a Directory in File Manager
How to create or Edit a File in File Manager
Uploading Files
How to Upload Files Using File ManagerThe files in your site are stored in directories. Directories can hold other sub-directories. The result is a directory structure that can have many sub-levels. Any of those directories can contain files. How you organize your directory structure is up to you.
How to Navigate in File Manager
From your Control Panel, select the File Manager icon.
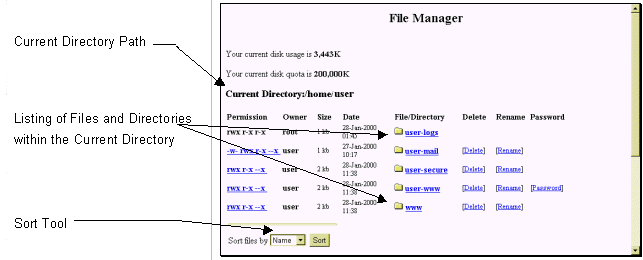
The File Manager window appears:
Once the File Manager window has opened, you will see a listing of directories and files located in your Current Directory, the path of which is displayed in the listing above.
Notes: File Manager does not display hidden files (i.e., files whose names begin with a period (.), such as ".htaccess"). · The Permission, Delete, Rename, and Password columns will be discussed later in this section.
Each directory and file within the listing will appear as a hypertext link. In the image above, links appear blue and underlined. Simply click on any link to drill down into that directory. In the case of a file, clicking on its link will open the file (if it can be opened by the browser).
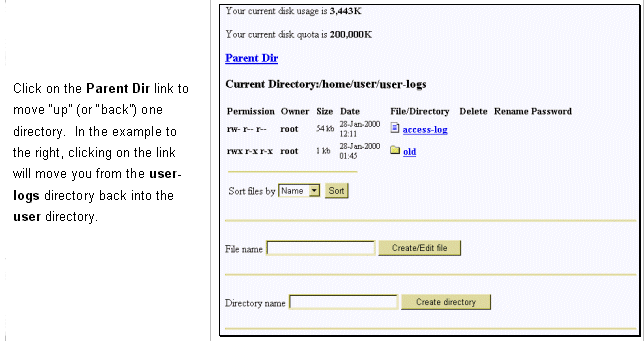
The image below shows what happens when you drill down into a directory. (In this case, the directory user-logs was opened.)
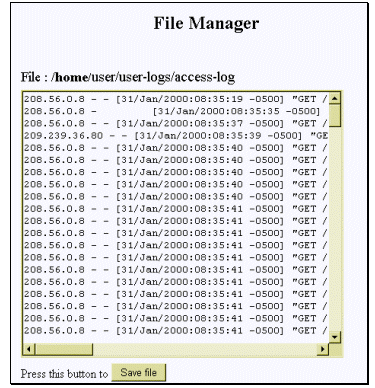
The next image shows the result of drilling down into a file.
(The image is of the file access-log).
To move "back" one directory, click on the Parent Dir link
Back to the topWhen in a directory that has a large number of files, the files are listed alphabetically by file name. Sometimes, it is desirable to see the listing of files sorted by the time (date) of their creation or by the size of the files, from largest to smallest.
Note: · The alphabetical sorting option is case-sensitive. This means that file names beginning with upper-case letters come before file names beginning with lower-case letters. The sort order is A-Z, then a-z. This means, for example, you could have a file named WORDS.TXT listed before a file named a-plus.htm.
How To Use the Listing Sort Tool
1. When in the File Manager screen, the Sort Tool is located at the bottom of the current file listing.
2. Click on the Sort files by: drop-down list to display a listing of sort options. These options are Name, Size and Time. Select the desired option.
3. Click on the Sort button. The screen reappears with the files and directories listed in the selected sort order.
Note: · Once a Sort order has been specified, it will be applied to all listings for the duration of your session. To change the sort order back, repeat the process described above, and choose a different sort option.
Back to the topChanging File and Directory Permissions
Permissions can be set for your directories and files. These permissions determine who can view, write to, and/or use the directories and folders in your site.
The permission settings are each comprised of nine letters (or characters) in a row that appear to the far left of the listing for each directory or file. Each letter represents a type of access, while the position in the nine-digit string dictates who has that type of access. The characters displayed in these settings can be r, w, x or -.
- r stands for read access; whoever has this level of access can view the file or directory.
- w stands for write access; whoever has this level of access can overwrite existing files or write new files in the specified directory.
- x stand for execute access; whoever has the level of access can run executable files.
- - (the dash) indicates that no permission is given.
The first three positions in the nine-digit string are the permission settings for the owner. The second three digits are for any groups (if any groups are created), while the last three digits are the permission settings for others (anyone who is not the owner, or is not a part of a previously declared group).
How To Change Permission Settings on Files and Directories
From within the File Manager screen, click on any of the Permission Setting links for the desired file or directory. The Change Permission screen displays.
1. The Change permission of file or directory name message indicates which file or directory permissions you are changing. Once a directory's permissions are set, you can access specific sub-directories and files within the directory to alter the settings on an individual basis.2. Notice in the Change Permission screen the nine-digit setting is split up into the groups that were discussed earlier: Owner, Group and Others.
3. As the owner of the file or directory, typically you should have full access, so all three settings r, w, x (read, write, execute) should be selected.
Back to the top
4. If you have set up groups (which involves the creation of a group and the addition of usernames into the group) select the appropriate permission settings. If this group is a collection of people to which you are giving the ability to see and use files which you are otherwise denying to other people, then select the read and execute settings. If this group is more of a workgroup, containing members who will be working with files and directories on your site, then it would be appropriate to select the write setting also.5. The Other settings depend on how much access you want to give provide globally· Typically, both read and execute access are given to everyone while write access is denied. This allows people to view and use your site without being able to change it. However, there may be items that you wish to keep hidden from globally, in which case you would disable the read and, depending on the file or directory, execute permissions.
6. When all of the settings are correct, select the Submit button to finalize the changes. The File Manager window reappears with the new settings.
Back to the topDeleting Files and Directories
Specific files and directories can be deleted from your site using the File Manager option.
Warning: · Be sure to verify that the files and directories you select for deletion are indeed ones you want to delete.
How To Delete Files and Directories
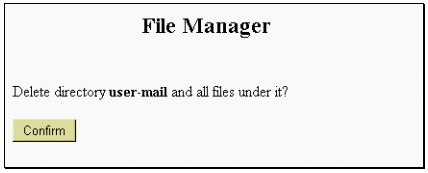
From the File Manager, select the Delete link that corresponds to the file or directory you would like to delete. The Delete Confirmation page displays.
Warning: · Deleting a directory automatically deletes all files and subdirectories located within it.
Note: · When deleting a file, the Delete Confirmation page displays the message "Delete File: Filename?"
If you are sure that you want to delete the file or directory, select the Confirm button.
After Confirm has been selected, the File Manager reappears, open to the most recent directory.
Back to the topRenaming Files and Directories
Files and directories can each be renamed using the File Manager option.
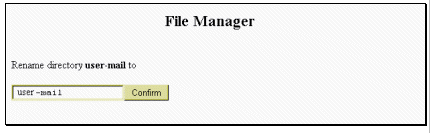
How To Rename Files and Directories
From the File Manager, select the Rename link that corresponds to the file or directory you would like to rename. The Rename Confirmation page displays.
If you are sure that you want to rename the file or directory, type the new name in the blank field and click the Confirm button.
After Confirm has been selected, the File Manager reappears, open to the most recent directory.
Back to the topThe Directory Protection Manager
The Directory Protection Manager is also available from the File Manager page. This tool allows you to set password protection on specified directories. This tool is accessed by clicking the Password link for the directory to which you would like to apply password protection.
How To Apply Password Protection to a Directory
From the File Manager, select the Password link that corresponds to the directory to which you would like to apply password protection. The Directory Protection Manager page displays.
In the section marked Choose the directory you would like to work with, the Directory field should display the desired directory. If it does not, select the appropriate directory by using the field's drop-down list and clicking the Load button.
In the Add/Modify a user for directory: "directory name", type an existing or new user name in the User ID field.
Back to the topType a password for that user in the Password field. If you are creating a new user name, the password is created along with it. If you are modifying an existing user name, the original password is changed to whatever you enter.
Once the information is entered, select the Submit button. The Directory Protection Manager page reappears with an additional option available.
Now, there is a section called Remove a user for directory: directory name. Once there is a user set up with password access to the directory that user can be removed by selecting the user name from the User ID field then clicking on Remove.
When finished, select the Control Panel link (it could have another name) in the right corner of the top frame to return to the Control Panel. There is no direct link straight back to the File Manager from here.
Creating Files and Directories
Files and Directories can be created within File Manager.
How To Create a Directory in File Manager
From File Manager, click on the field called Directory Name.
Type the name of the directory you want to create in this field. Select the Create Directory button.
The File Manager reappears with the newly created directory in the listing.
Back to the topHow To Create or Edit a File in File Manager
From the File Manager, move to the field entitled File Name.
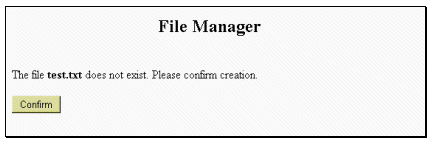
To edit an existing file, type the name of that file in the field shown above. To create a new file, type the new file name in the field shown above.
Select the Create/Edit file button. If creating a new file, the following screen appears. If working with an existing file, the file automatically opens, skipping the next step in this procedure.
Select the Confirm button, which acknowledges that the file does not already exist and that you are creating a new file.
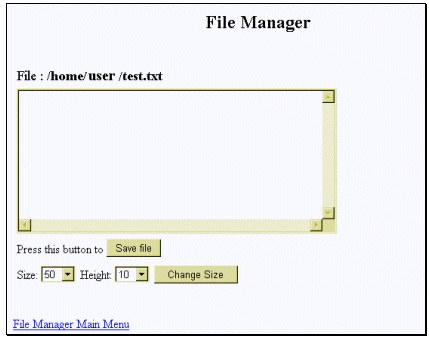
The File Manager File Screen opens. If you are creating a new file, an empty window appears. If you are editing an existing file, the file contents should display in this window.
Back to the top
Make any necessary changes or additions to the file.
If desired, you can change the size of the window in which the file is displayed. To do this, select a new Size or Height (or both) from their respective drop-down lists and click on the Change Size button.
When all changes have been made, select the Save File button to save the file. The File Manager page reappears with the newly created file (if any) displayed in the listing.
Note: If you wish to leave this screen without saving the file (or saving changes to the file), select the File Manager Main Menu link.
Back to the topYou can upload files from your local computer to your site using File Manager.
How To Upload Files Using File Manager
In File Manager, move to the field near the bottom of the page entitled Send this file.
If you know the full path and filename for the file you would like to upload, type it into the field and skip the next step. If you do not, select the Browse button.
In the File Upload window, select the file that you would like to upload. You may have to change the Files of type field for your file to be displayed in this window. Select the file for uploading by double-clicking it or by highlighting it with a single click and selecting the Open button. The File Upload window closes and you return to the File Manager. The Send this file field now displays the full path and filename of the file you selected.
Warning: You cannot upload files larger than 10240 KB in size. This is approximately 10 Mb.
Select the Upload button. A new page displays informing you that the file you selected has been uploaded.
To return to File Manager, select the File Manager Main Menu link. To return to the main Control Panel page, select the Control Panel link located in the right corner of the top upper frame.